APPENDIX B
Model Stand and Sunpath Simulator
- Heliodon Description
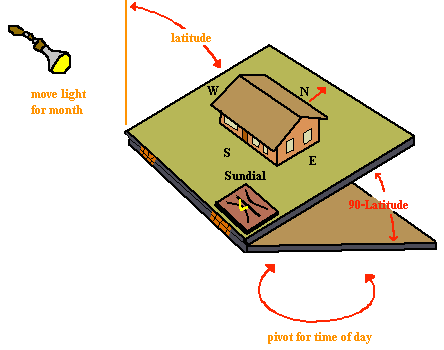
- A heliodon is a device that correctly simulates the sun's position or motion relative to a reference surface (simulating a horizontal surface on the Earth). This simulation can be accomplished with a fixed light source and a plane (representing the horizontal) tilted at the complement of the latitude in question (90° minus the desired latitude) and pivoted around a vertical line (zenith). See Figure B-1.

- Figure B-1.
- Heliodon Model Stand with Adjustment for Month, Time of Day, and Latitude.
- The time of year, time of day and latitude on the Earth can be correctly simulated by the heliodon with simple adjustment. The latitude is represented by the tilt of the reference plane from the zenith angle. The complement of the latitude (90° minus the desired latitude) is the tilt angle of the plane from the horizontal. Although this plane can be changed for different latitudes, when designing a building for a particular location the latitude is fixed. The time of year can be adjusted by moving the light source up or down in relation to the center of the tilted plane. A range of solar altitude angles can be evaluated from low winter to high summer angles. The time of day can be simulated by pivoting the plane around the zenith while its tilt to the horizontal is kept constant. While these adjustments sound difficult, they are easily accomplished with two planar surfaces hinged together and pivoted by bearings on one of the surfaces.
- Model Stand Construction
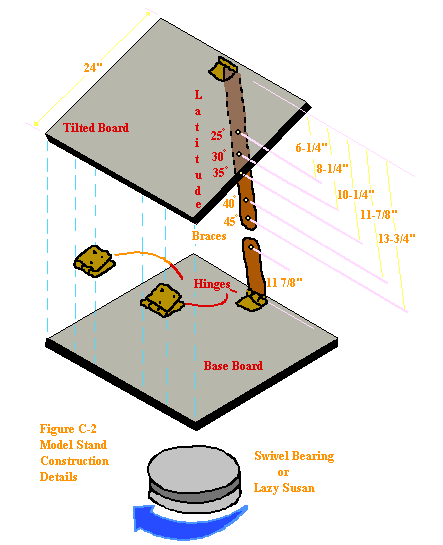
- The model stand described below is constructed of two square pieces of plywood hinged together with swivel bearings (lazy susan) mounted on the outside center of one of the boards. A brace (or braces) attached to another hinge is needed to tilt one board away from the other. When not in use the stand can be collapsed and becomes only a few inches thick. The parts required for a model stand which i two feet square are listed.
- The length of the braces for this two-foot-wide stand is dependent upon the latitude. For a brace that attaches to the outside edges of both boards the total lengths required are 18 3/8", 20 1/2", 22 1/2", 24", 25 3/4" for latitudes of 45, 40, 35, 30, and 25, respectively. An adjustable model stand can easily be built for all of these latitudes with the two braces as shown in Figure B-2 and by using pin or bolt in the appropriate hole. For larger model stands adjust these dimensions proportionately.

- Figure C-2.
- Heliodon Model Stand with Adjustment for Month, Time of Day, and Latitude.
- Setting up Model Stand
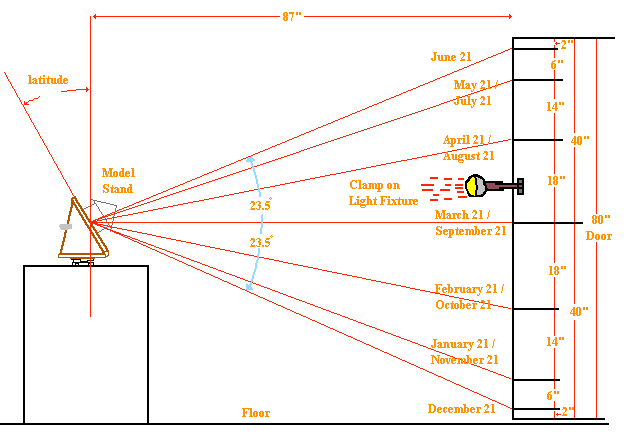
- The model stand should be set up on a box or edge of a table about 40" off the floor. A light source is needed which can be moved up or down to simulate different seasons. A clamp-on light fixture with a flood lamp or bulb and reflector is recommenced. One good place to attach the light in any room is the edge of a door. The position of the light to simulate each month is shown in Figure B-3 for a 6'8" door, 7'3" from the model stand. (Note: the center of the model stand should be at the same height, 40", as the center of the door.) If a door is not used, a small sundial can be attached to the tilted board and the light moved up and down until the sundial shadow indicates the proper month.

- Figure B-3.
- The hinged edge of the two boards is the south direction to a model mounted on the tilted board, and the top edge is the north as show in Figure B-1. The model can be attached to the tilted board with push pins, tacks, screws, or tape. It is also convenient to cover the tilted board with a low nap carpet and to use Velcro hook tape to hold the model in place. Being nondestructive to the model, this also allows easy repositioning of the model. The model stand can simulate sun motion for any building orientation (i.e., SSE) if the model is mounted on the tilted plane with the correct reference to the south (hinged edge). Scale model trees, trellises, adjacent buildings or other objects can be placed on the model to observe their shading patterns.
- Evaluating Building Designs
- Scale models for buildings can be visually observed while simulating the sun's motion. Three significant building design features can quickly be checked in this manner. First, move the light to its highest position to simulate summer (June 21). Rotate the model from sunrise to sunset, and see if the windows are completely shaded throughout the day. One may also want to look at spring and fall or late summer months to see how much of the windows are shaded. Secondly, with the light mounted at its lowest position to simulate winter conditions (Dec. 21), pivot the model stand from sunrise to sunset, and check to see if the south facing windows are completely unshaded. Overhangs designed to shade the summer sun can partially shade windows in the winter if the overhang is too close to the top of the window. This problem is caused by a common design error due to simple overhang formulas.
- Finally, with the light still in the low winter position, remove the roof of the model and again pivot the model stand while watching the penetration of the light (sun) coming through the windows. The parts of the model's interior walls and floors that are lit most of the day are the best locations for thermal mass.
- The model should have interior partitions so light that strikes them can be seen. The north-south interior partitions can catch a significant amount of light near the south wall and can be effective locations for thermal mass.
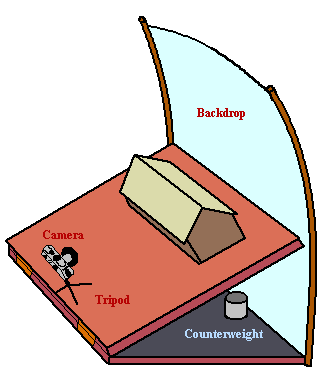
- In addition to visual observations, the model stand can be used with still or movie cameras to document different seasons, shading devices, or building orientations. Simply mount the camera with a bolt or spacer, mini-tripod, or camera clamp to the model stand looking in the direction you wish to observe as shown in Figure B-4.

- Figure B-4
- Photographing Shading Patterns on the Model Stand
- If the south elevation is of interest, mount the camera near the hinged edge of the model stand looking (north) at the model. The camera can also be mounted at the corner of E, W, or N edges or above the model to see different views. You may have to balance the camera's weight by placing a comparable weight object on the base board as a counterweight. Once the model stand is balanced while still, it will pivot smoothly and stay balanced. A wide angle lens may be needed on a small model stand to focus at close range. This will also give perspective to the photographs. To make photographs realistic, use a backdrop of light blue cloth or a scenic poster draped from supports attached to the model stand as shown in Figure B-4. This backdrop and the camera will move with the model while the shadows change as you pivot the stand. This makes realistic motion pictures possible, because the only apparent motion is shadows moving across the model.
- The model stand can also be used to observe daylighting design. To simulate daylighting correctly, the interior surfaces of the model and the outside ground surfaces must have reflectances representative of the room interior and exterior. The light source can be dimmed and adjusted until the light intensity is appropriate for the time of day and year simulated. If a camera peep hole is made in a wall of the model, photographs of the daylit interior can also be taken.
Comments or questions to: TechAsmt@LA.GOV
Return to Solar Orientation


